Follow Me on Pinterest

Friday, February 15, 2013

Friday Five: Valentine's Day Stuff

I was trying out the idea of posting five of something every Friday, but didn't commit to it before. Here's my second attempt. If I fall flat this time, I'll graciously accept defeat and stop trying to force myself into a mold I'm unable to fit. 

Here are my five fun "projects" I completed this year for Valentine's Day

Red Velvet Cupcakes
These are my nurse's absolute favorite cupcakes in the whole wide world. Last year after I made them for Valentine's Day she paid me to make them for her daughter's birthday and hasn't stopped talking about them. I adapted the recipe for the cupcakes from Brown Eyed Baker's blog (follow her recipe, except decrease the red food coloring to 1 tbsp and replace the other 2 tbsp with water). I think cream cheese frosting is too overpowering for these yummy cakes, so I top it with my favorite marshmallow buttercream from Baked Bree's blog.

Hello Kitty Pops
These aren't Valentine's Day specific, but I made them as treats for my older daughter's preschool class to match the Hello Kitty valentines she picked out. They came out really well in the end, but I STRUGGLED with these. As a rule, I do not use cake mixes or canned frosting because they are so highly processed and icky, but I was just too swamped to make the cake and frosting from scratch and then put the pops together. As payment for cheating I had to deal with the pops falling apart on me from being too soft. I usually make a ganache as the frosting to bind the cake better - without it they were so much less stable! I started out with 20 balls of cake, 6 balls completey fell off the sticks during the dipping process, and another 4 were a bit crooked (but held together well enough that I deemed them passable for 4 year-old kiddos). Here's Bakerella's tutorial.

Homemade Crayon Valentines
I saw the idea for these all over Pinterest in the past month, but somehow failed to ever re-pin one of them. When I came around and decided I wanted to make them, I came up with my own directions. I used ice cube trays I purchased in the Target dollar bins, a few dozen chopped up crayons (including some metallic and glitter ones to give our crayons sparkle!), the Cricut to cut out the hearts, and penned the saying "Color me excited to have a friend like you!" on each one. 

Teacher Valentines
Awhile ago I pinned an "end of the year" teacher gift that was a small fabric basket with an apple print that was filled with Hershey's Hugs with the saying, "Teachers can't get by on APPLES alone, they need HUGS too!" I thought this would make a cute Valentine, so I saved a half dozen of the red velvet cupcakes to make my "apples." Instead of piping a swirl of frosting on top, I used a spatula to spread it flat and then dipped the tops into red sanding sugar. I used half of a pretzel stick to make the "stem" and a green jelly bean to make a "leaf." I added a layer of Hugs to the clear plastic cup, placed the cupcake on top, then wrapped it up in a clear bag and attached the tag (made with the Cricut) with ribbon.

Curly Ribbon Bows
I found a tutorial (I can't remember the tutorial I used, but I'll put my own up soon) on curling grosgrain ribbon in the oven and have been obsessed ever since. Using a package of hair clips and heart shaped buttons from Hobby Lobby, a roll of Valentine ribbon from the Target dollar bin, and my hot glue gun I made a pair of these for my bug to wear for Valentine's Day. 

That's it! I hope someone is inspired to do some baking/crafting/creating of their own!

Wednesday, February 13, 2013

Recipe Makeover - Panera Mediterranean Veggie

My favorite lunch from Panera Bread is easily the Mediterranean Veggie Sandwich. You can read all about it by following the link, but in short it's a tomato basil bread topped with hummus, feta, red peppers and other assorted fresh veggies. At 15 WW points, I won't be indulging anytime soon. Instead, I created this low point mock-up at home. Although a bit messy to eat, it was super tasty and totally satisfied my craving.

Mediterranean Veggie Sandwich Makeover (6 points plus)

To make it you need:
  • 1 Thomas bagel thin (Sundried Tomato and Basil flavor)
  • 2 tbsp hummus (I used Trader Joe's Three Layer Hummus)
  • 1 oz roasted red peppers packed in water
  • lettuce, any variety
  • 1 tsp olive oil
  • 1 tbsp balsamic vinegar
  • 1/2 zucchini sliced into strips
  • 3 oz mushrooms sliced
  • 1/2 onion sliced thick
  • 1 oz fat free feta cheese
Directions:
  1. Warm oil in a frying pan over medium heat. 
  2. Add all fresh veggies and cook for 5 minutes until slightly softened.
  3. Add balsamic vinegar, reduce heat to low, and cook until veggies are done (how "done" is a personal preference) and then cool.
  4. Spread 1 tbsp of hummus on each half of the bagel thin.
  5. Layer lettuce, cooled vegetables, red peppers, and feta.
  6. Enjoy!

Tuesday, February 12, 2013

Brown Butter Banana Bread Cookies


I almost always have bananas in various stages of ripening on my counter because I only like to eat them once they are yellow and just starting to turn a few brown spots - but if they get too many spots the deal is off and the idea of eating one literally makes me gag. Once they reach the perfect ripeness, I need to eat them within 48 hours or they become baking material. This insanity is why I am always on the lookout for good recipes to use up bananas. I pinned this recipe from Tracey's Culinary Adventures and tried it out as soon as I had a few overripe bananas.

The cookies themselves are completely yummy and stand alone nicely without the frosting...BUT, I couldn't help trying it out. Although I followed Tracey's cookie recipe quite closely, I changed the frosting significantly to cut down the WW points (with frosting 4 points plus, without frosting 3 points plus).

For the cookie recipe, see Tracey's site. I only altered the spices - 1 full tsp cinnamon, 1/2 tsp nutmeg, 1/4 tsp allspice, and 1/4 tsp ginger to make them stronger. I made 36 cookies by measuring level tablespoons.

For the frosting:
2 cups confectioner's sugar
1/4 cup butter
2-4 tbsp fat free half and half
1 tsp vanilla extract

Melt the butter in a small pan over medium heat. Swirl the pan frequently allowing the butter to cook until you start to see small brown flecks in it - be careful not to let the butter burn! Add the melted butter (make sure to scrape the yummy browned bits out too!) to a heat-proof bowl with you confectioner's sugar. Add vanilla and 2 tbsp of the half and half. Beat until well blended. If the frosting is too thick, add more half and half by the tsp until it is the consistency you want.


Monday, February 11, 2013

Mommy of 2!

Today I'm previewing a new "segment"  called "Mommy Tips" to try and stop myself from only posting recipes...we'll see how it goes!


I can not believe this, but my little bear is already three months old!  As much as we wanted to have another one, I have to be honest and say that reverting back to the newborn days was a little intimidating. I wasn't looking forward to getting back into a nursing schedule and being up every 3 hours or to changing diapers 24/7, but what I was really worried about was how the bug was going to adjust to the new baby. My bug is beautiful, wonderfully pleasant, and so smart you forget she's only three 75% of the time - the other 25% she is a stubborn, spoiled rotten tantrum machine. I feared the new baby would tip the scales and reverse the equation.

Three months later I'm pleased to report that the transition from a three to a four person household was MUCH easier than I expected. Thanks to a wonderfully mellow infant and some careful planning on our part, we slipped easily into a new routine. I can not understate how much the bear being a good baby helped this process, but here are the details my husband and I tweaked to keep things on track...

  1. Celebrate the big brother/big sister - right away! Pack a special gift for your older child right into your hospital bag so you have something to give him/her when he/she comes to the hospital to visit the baby. For our bug we told her the gift was from her baby sister, but for an older child the gift could be from mommy and daddy. Our gift was a small backpack from Hobby Lobby personalized with a "Big Sister" iron-on and filled with a Disney princess baby doll, some craft activities, and a few edible treats (yogurt raisins, cheese crackers, and something chocolate).
  2. Set aside alone time early on. When I say alone time, I really mean it - physically have the baby in a different room and devote all of your attention to the big brother/big sister to remind them that you are still there for them 100% too. We put the baby down for a nap in her swing in the living room and then made a fun dessert treat in the kitchen together while we listened to bug's favorite music. A few other times we did the same thing and had a "dance party" where daddy played music while the bug and I dressed up in her princess dress-up clothes and made up silly dances. *For the dessert I used a muffin tin and filled each hole with a different dip-able item (strawberries, pineapples, pretzel sticks, marshmallows, etc) and melted some chocolate chips for dipping.*
  3. Involve the big sister/big brother in caring for the baby. Help the older siblings create a bond early on by giving out small tasks they can do to help you care for the baby. Asking the older sibling to bring you a diaper/wipes, pick out pajamas or clothes for the baby, sing the baby to sleep, or wash the baby's toes/tummy in the bathtub (avoid the eyes!) can help ease the transition.
  4. Avoid saying you can't do something because of the baby. Let's be honest, there are going to be many times when your older child wants you to do something that you can't do because of the new baby. Even when it's something obvious like the baby is nursing so you can't make pancakes that second, it is going to sound much different to your child if you say, "Mommy would love to make you pancakes, but I need to be sitting down right now. Can you bring me the "If You Give a Pig a Pancake..." book? We can read that first, talk about what kind of pancakes you want, and then I'll be ready to make them!" instead of, "Mommy is feeding the baby, I can't right now," It takes a bit more effort, but is very worth it!
  5. Give THEM alone time. Before you think I've lost it telling you to leave your baby alone with another child, hear me out. My kids are 3 1/2 years apart. They clearly need supervision, but I like to think of it as "indirect supervision." Not when the baby was a newborn, but now that she's a few months old I will put them in the crib together or let them lay on the carpet in their room together and pretend not to be paying attention while they play together. Sometimes I stay in the room and read a book, other times (like right now) I sit right outside the room so they can't see me, but all I have to do is move my head and I can see them. I try not to interrupt their play unless the bear starts to cry or the bug is about to do something potentially dangerous.
  6. Arrange activities for the big brother/big sister. With all the visitors coming to see the baby, your older child may start to think they aren't important to everyone else anymore. Although you never want them to feel like you are trying to "get rid of them", it can be a great idea to set up little trips for the older siblings to remind them how special they are to other family members. A sleepover at grandma and grandpa's house, a trip to the mall with an older cousin, or a movie date with an aunt/uncle are all potential ideas.
I really hope these tips help someone out there!

Wednesday, January 30, 2013

Oreo Cupcakes


I fear my blog is very bipolar these days. I'm flipping between healthy Weight Watchers recipes and super decadent desserts faster than yours truly a kid can devour a chocolate bar. It just so happens that January is a birthday heavy month for my family and friends while I am still (mostly) sticking to my new diet. And honestly, I just LOVE to bake - birthdays or no birthdays, diet or no diet.


The recipe I am sharing today is one of those that didn't have an occasion. I stumbled across a few different recipes using Oreo cookies on one of my favorite cooking blogs (Annie's Eats) and couldn't get them out of my head until I gave it a try. I followed her recipe for the cupcakes exactly. I intended to top them with a marshmallow frosting I pinned awhile back.

Following the directions, the frosting came out beautifully - nice pillow-y, shiny peaks of lightly sweetened, fluffy goodness. Then, I had the brilliant idea to add crushed Oreos, destabilized it, and turned it into soup. The second time around I stuck with a classic buttercream and balance was restored to the universe as cake and frosting came together to create these delicious treats.


Buttercream Frosting
2 sticks of butter, at room temperature
2 1/2 cups confectioner's sugar
1 tsp vanilla extra
1 tbsp heavy cream

  1. Beat the butter in the bowl of a stand mixer for a full five minutes on medium speed until it is whipped
  2. With mixer on low, add the confectioner's sugar gradually until all is incorporated
  3. Scrape down the sides of the mixer with a rubber spatula
  4. Add the vanilla and heavy cream
  5. Beat for 2 minutes on medium/high speed
  6. Use pastry bag to pipe frosting
  7. Sprinkle with crushed Oreos (if desired)

The secret surprise in these cupcakes: half an Oreo in the bottom of the cupcake liner!
My little taste tester - note: she only eats her cupcakes with LOTS of added sprinkles

Sunday, January 27, 2013

WW Silver Dollar Fruity Pancakes

This morning the bug asked for pancakes. This is a meal I have been avoiding since starting Weight Watchers, but I decided it was time to work out a recipe we could all live with rather than deny her a favorite weekend treat. Here's what I came up with...

Silver Dollar Fruity Pancakes - makes 5 servings
3 points+ per serving, each serving = 7 pancakes

Ingredients
3/4 cup of skim milk
2 tbsp white vinegar
1/2 cup unbleached white flour
1/2 whole wheat white flour
1 tbsp white sugar
1 tsp baking powder
1/2 tsp baking soda
1 egg
1 tbsp light butter, melted (I used Balade from Trader Joe's)
1 tsp vanilla extract
Assorted thinly sliced fruits (bananas, peaches, apples, etc) or berries

Directions
  1. Add vinegar to milk and allow to sit for at least 5 minutes so that the milk "sours" (gives the effect of buttermilk in the recipe)
  2. Combine all dry ingredients in a large bowl and whisk to combine
  3. Combine all wet ingredients in the measuring cup with the milk and whisk to combine
  4. Add the wet ingredients to the dry ingredients and mix until just incorporated
  5. Drop level tablespoons of batter on a hot griddle or pan that has been coated with cooking spray
  6. Add fruit to each pancake as it cooks
  7. Flip each pancake after ~2 minutes and cook an additional 1-2 minutes on the other side
  8. Enjoy with maple syrup (extra points) or more fresh fruit

Dry Ingredients
Wet Ingredients
Yummy Batter
Frozen Raspberries, Frozen blueberries, & Banana Slices
On the Griddle
Breakfast is Served!
(only 6 pancakes are shown, but a serving is 7 - I couldn't help eating one fresh off the pan)

Sunday, January 20, 2013

Hazelnut Mocha Cupcakes with Espresso Buttercream

This past week the office manager for my practice celebrated her birthday. Since I began working with her last year she has been a HUGE help for me. She has been an advocate for getting me integrated into the practice and has talked me up to recruit new patients - in summary, I love her! I wanted to make her a special treat for her birthday so I took something I love doing (baking cupcakes) and combined it with something I know she loves (coffee) and something everyone loves (nutella!) and created these...


Hazelnut Mocha Cupcakes with Espresso Buttercream
I searched through lots of recipes and combined a few different ideas I saw along the way. The cupcake and frosting recipe can be found here. I upped the yum factor by adding nutella.
  1. Cook cupcakes according to directions
  2. When the cupcakes are cooled, use a melon baller to scoop out the middle
  3. Soften about 1/2 cup of nutella in the microwave on half power for 30 seconds
  4. Using a pastry bag, fill in the cupcake with about 2tsp softened nutella and replace the scooped out ball of cupcake on top (squish it down so the top is mostly level again)
  5. Follow the frosting recipe and pipe frosting on top
  6. Decorate with mini chocolate chips, chocolate shavings, chocolate sprinkles, or chocolate covered espresso beans

WW Buffalo Chicken Quesadilla

I joined Weight Watchers 8 weeks ago right before the holidays to keep myself from gorging and putting myself in a daily "I-just-had-a-baby-and-am-nursing-so-it's-still-OK-to-eat-whatever-I-want" food coma. Following the plan I've lost a little over 10 pounds and, as of today, have finally reached a weight that puts me back in my pre-med school and residency weight range! Here is one of the recipes I created during my journey so far...

Buffalo Chicken Quesadilla with Blue Cheese Broccoli Slaw (8pts+)
Follow Gina's recipes over at Skinnytaste to make a crockpot full of the spicy, tender, buffalo chicken-y goodness and homemade blue cheese dressing you need for this recipe. You'll have enough shredded buffalo chicken and dressing for this and a few other meals.


Ingredients
1/2 cup shredded buffalo chicken (3pts+)
2 Trader Joe's (or other) low-carb whole wheat tortilla shells (3pts+)
1 oz shredded 2% sharp cheddar (1pt+)
2 TBSP homemade blue cheese (1pt+)
1 cup broccoli slaw (0pt+)

Directions

  1. The Trader Joe's tortillas are a bit softer and more pliable than a regular flour tortilla, so I like to crisp them up a bit by just toasting each side on a hot pan or griddle for minute or so before proceeding.
  2. Place a pre-toasted tortilla in a hot pan, top with 1/2 the cheddar, all of the chicken, the other 1/2 of the cheddar, and the second tortilla shell.
  3. Cook each side for approximately 2 minutes or until cheese is melted
  4. Cool the quesadilla while you make the broccoli slaw by mixing the raw slaw mix with the blue cheese dressing
  5. Cut the quesadilla into 6 wedges
  6. Serve - I like to use the slaw like a salsa on top of the quesadilla wedges.

Friday, January 18, 2013

21 Days - An Update


Sorry for the silence, but last week ended up getting BUSY. I had a very long Tuesday with a meeting I forgot about after work until 8:30 and missed my free Thursday morning when my colleague was sick and I was asked to come in early to see some of his patients. This week has continued to be busy as the baby bear didn't start daycare because her pediatrician rescheduled her appointment I wanted to give her time to build immunity after her shots.
 
Even with all that I've made it up to Day 12 and have only missed one day and rescheduled one day! I planned my kitchen pantry for last Thursday morning (no husband, no bug, perfect time to get some real cleaning done), but went to work instead. My pantry is a HUGE project (see below) so I doubled up on Sunday and cleaned the kitchen storage shelves to free up this Thursday.

Here's my progress...

Day 3 - Entry/Coats
BEFORE: Too many coats, a guitar, too many shoes, and general clutter!
AFTER: Coats not in use moved to basement, shoes moved to bedroom, craft supplies moved to where they belong, peds textbooks brought to my office, and I finally parted with my emergency code cards and ID holder from residency:-(
Day 4 - Bookcase
Before: Too many books and general disarray

AFTER: I cleaned up by separating books into catergories: 1. Books we read all the time, 2. Books we never read, 3. Books we read sometimes, and 4. Books we have doubles of. Catergory 1 stayed on the shelf and got organized. Caterory 2 got donated to my office waiting room. Catergory 3 got moved to the small toy organizer in the playroom. Catergory 4 got moved to a storage bookshelf downstairs in the basement
Day 5 - Pantry
Do you SEE this monstrosity?!...POSTPONED until 1/17

Day 6 - Toy Box

BEFORE: You can't even tell how much junk is in this toy box because it is just full to the top!
AFTER: Oh so organized! Junk paper discarded, playdoh returned to the playroom, markers/crayons/stickers all organized into plastic bags/bins to make for easy crafting, and books organized so we can see all the titles easily

Day 7 - Kitchen Cabinets
I have a lot of cabinets, so I tried to just snap photos of the biggest changes...
BEFORE: Literally eight dozen cookie cutters, hundreds of cupcake liners, over a dozen bottles of sprinkles, entertaining dishes, and other assorted baking and candy making supplies
AFTER: Cookie cutters moved to a bin in the basement. Cupcake liners and candy bags on the left, sprinkles (yes, those are ALL sprinkles) on the right
AFTER: Sprinkles moved and everything else straightened up
BEFORE:  Too many dishes and gadgets we don't use.
AFTER: Items not in use put in storage, everything else re-organized
Day 8 - Dressers and Kitchen Storage
No photos of the dressers, but I went through the girls' drawers to weed out too small clothes. Here's the kitchen organizer...
BEFORE: TONS of craft supplies and papers littered all over the top of the shelves and in some of the lower cubbies
 
AFTER: Craft supplies condensed with ultimate goal to move them into the craft bins in the basement on "craft supply" organization day. Other shelves cleaned up with organized
 
Day 9 & 10  - Make-up Bag and Jewelry Box
Small, quick clean-up projects not worth photographing:-)
 
Day 11 - Bedroom Closets
This is the day I missed and will add it to my Sunday organization as my fridge and freezer are pretty easy as I obsessively organize them once a week already.
 
Day 12 - Kitchen Pantry
This is one area that I tend to "let go" on a week to week basis and end up needing to really clean up every few months. In addition to all the cluttered shelves you can see, on both sides of the closet are deep narrow wooden shelves that accumulate SO MUCH junk!
BEFORE: Too many boxes with just a little bit of food left in them, bags and a spilled bag of stellatine pasta all over the floor, and a disgusting amount of candy given to the bug hidden in one of the deep shelves on the upper right
 

AFTER: I went through all the boxes of crackers/cookies/etc and anything with less than 5 portions got divded into snack size ziploc baggies and the boxes recycled. I threw away an insane amount of candy we have built up since October (the last time I purged the sugar supply) - if we let bug eat all the candy she was given she would be a poster child for childhood obesity. I moved everything out and reorganized a bunch of the baking/candy supplies that were scattered about and swept up the spilled pasta and M&Ms.
 
And that's it! Tonight will be the linen closet which is teeny and not very exciting, so don't expect photos. I'll check back in with more photos, tips, and progress in a few days.


Tuesday, January 8, 2013

WW Roasted Cauliflower

During my weekly meal planning this past weekend I pinned a recipe for Roasted Cauliflower (3pts+) from Skinnytaste that I thought would pair well with the Vegetable Turkey Meatloaf (5pts+) from LaaLoosh that has become a favorite in our house. I'm not sure if the head of cauliflower I bought was just smaller than Gina from Skinnytaste used, but a whole 1/4 of olive oil seemed like too much when I was looked at the bowl of florets I had trimmed up, so I ended up modifying the ingredients. I decreased the olive oil and increased the lemon and then roasted it with the garlic, salt, and pepper. Being my usual starving self, I grabbed a piece to taste as I was about to top with the cheese and decided it was tasty enough without it! With these adjustments I was able to lower the points and increase the portion size (who wouldn't want that?!).

We had already devoured more than half of this yumminess before I remembered to snap a photo, oops!

Roasted Lemon Garlic Cauliflower (4 servings, 2pts+ per serving)

Ingredients
  • 1 medium-large head of cauliflower
  • 2 tbsp olive oil
  • 1 tbsp lemon juice
  • 1 tsp minced garlic
  • Fresh grated pepper and sea salt
Directions
  1. Preheat oven to 450 degrees.
  2. Chop head of cauliflower into small florets. Rinse and pat dry.
  3. Toss florets in a large bowl with all other ingredients to coat.
  4. Spread cauliflower out on a lined baking sheet or in a shallow dish.
  5. Bake for 25-30 minutes, turning florets every 5-10 minutes so they cook evenly.

21 Days of Organization


During a previous post I mentioned having found a "21 Day" plan to help organize and clear out clutter from our home. As I am a working mom with a funky schedule (Mondays off with both kids, two full days of work, one half day with both kids, and one half day with one kid), I needed to modify the plans I found on other sites to fit what is possible for me and what our house really needs. Above you'll find the schedule I devised with the days of the week included. Feel free to copy and modify to suit your needs!

Day 1 - 21 Day Challenge - Medicine Cabinet

We don't have a medicine cabinet as much as a shallow floor to ceiling set of shelving built into the wall of our teeny, tiny bathroom. The top half of the shelves are open to view and the bottom half is concealed behind doors. This was a huge task to clean up and made me feel very motivated to keep up the challenge once I was done.
Upper shelving BEFORE photo
(Note bottles and bottles of baby lotion  which were given to me when my first daughter was born nearly 4 years ago that I never used because I don't believe in dyed/perfumed lotions for baby. Also, bin to the upper right full of gross bath toys that were finally ripe to be purged)
Upper Shelving AFTER
(Biggest improvement here was separating my husband's daily stuff from mine to avoid them all mashing together and us both fumbling through each other's stuff. Also, I moved all the medicines and our contact lenses up out of reach of our ever growing big girl to avoid ingestion or pouring of the contacts down the drain...again)
Lower Shelving BEFORE
(More than half of the medication on the top shelf turned out to be expired when I went through it)
Lower Shelving AFTER
(I threw away many unused bottles of lotion and rearranged to put kid friendly items low and dangerous ones high)
Day 2 - 21 Day Challenge - Purse

Take my word for it, I cleaned my purse. Photo proof doesn't seem necessary in this case:-)

Sunday, January 6, 2013

WW "Wake-Up Wraps"

Before deciding to "go healthy" my quick go-to breakfast when I was running late or rounding at the hospital became the Dunkin Donuts Wake-up Wrap. Although not terrible in terms of points (5 for egg and cheese and 6 for bacon,egg, and cheese), it is full of processed ingredients. Right now I have an excess of daily WW points because I am exclusively breast-feeding baby bear, but the day will come when I need to trim my points. Once I decided to start making my own, I make extras and store them in the fridge to eat for the next 2 days. They heat up in the oven at 350 in about 5 minutes.

Bacon, Egg, and Cheese Breakfast Wraps
At the top right - 7 point plus wrap for the bug
On the bottom left - 3 point plus wrap for me
Highest 7 point wrap is made of the following:
  • Mission flour tortilla soft taco size (3)
  • One Whole Scrambled Egg (2)
  • One slice Oscar Meyer Low Sodium Turkey Bacon (1)
  • Half an ounce of 2% milk sharp shredded cheddar (1)
Lowest 3 point wrap is made of the following:
  • Trader Joe's Low-Carb Whole Wheat tortilla shell (1)
  • 3 tablespoons Trader Joe's Cage Free Liquid Egg Whites (0)
  • One slice Oscar Meyer Low Sodium Turkey Bacon (1)
  • Half an ounce of 2% milk sharp shredded cheddar (1)
Depending on which ingredients you have available there are a variety of options. Another great option would be to forgo the bacon and scramble the egg with some veggies (mushroom, spinach, onion, etc).


A Whole New Year

Happy New Year!

I will be adding a post to complete our Elf on the Shelf 12 days to Christmas countdown, but I wanted to give a few thoughts on entering the new year first. Overall, I have to say that 2012 really turned out to be a good year. The biggest downs we experienced were some scary brushes with cancer for family members. Although my mother-in-law's scary diagnosis came in the late winter, that was quickly turned around when she was able to have a curative surgery, avoid any further therapies, and has been followed up with a clean bill of health at each doctor visit. Less fortunate was my half brother's wife who was diagnosed with cancer over the summer and is still undergoing her treatments - I am hopeful that 2013 will bring her recovery. Despite those downs, 2012 brought a year of remission for my husband's cousin in her battle with cancer and marriage to her long term boyfriend, new family ties with my half brother and his family that we have been estranged from for years, success in our careers for both my husband and I, new babies to ourselves and many other family and friends, and a beautiful wedding (and pre-wedding celebrations) for my little sister.

I'm hoping to get 2013 going on the right foot by declaring January a month of organization and routine for our family! Using my obsession with Pinterest, I've dug up or created the following plans for us:

  • I'm determined that "30 is my year" and am going to get myself healthy and in the best shape possible before my 31st birthday! I joined Weight Watchers after having my baby bear (and am already below pre-pregnancy weight!) and have a Pinterest board dedicated to saving my WW friendly recipes
  • I'm keeping meals organized by using a Pinterest board titled "This Week" to reference all the recipes I plan to make and to make shopping lists and shopping trips much easier to organize 
  • In addition to trying to make it to the gym 3 times a week, I am starting the 30 day Ab Challenge
  • Finally, I am going to try and get our house ready to be put on the market by following the 21 Day Organization Challenge
I'll try to stay up to date with how things are going in case anyone else wants to play along:-)

Sunday, December 16, 2012

Tis the season...


If you hadn't guessed by my prolonged silence after the last pregnancy related post...our second baby was born! Although she came 5 days later than my due date and I had the joy of two days of non-productive contractions, the labor and delivery were a breeze once everything got going. My recovery time was minimal and we all settled into a routine as a family of four without issue.

As I sit here typing this (almost exactly 6 weeks following her birth), I am feeling great. I've been back to work for 2 weeks, am 2 pounds below my pre-pregnancy weight, and am in the midst of my usual holiday baking/cooking/crafting craziness.

There is another thing that is new to our house this year for Christmas - we have our very own Elf! "Sugar" has been here keeping tabs on our little bug and reminding her to be a good girl for Santa. Sugar has been leaving the bug special treats each day to count down the 12 days until Christmas. Below you can see what we've been up to so far...
To kick-off, Sugar and her friends decorated bug's room with snowflakes and paper chains

12 - The first day featured a cup with hot cocoa mix and two new Christmas books

11 - Sugar left all the ingredients to make tree shaped pizzas for dinner
10 - Everything to make cinnamon ornaments
I didn't get a photo of Day 9 in time, but Sugar left her lots of silly dress up items to play with and pose for a silly photo shoot. Props included a singing tie, multiple headbands with bouncy Santas or snowmen, bead necklaces, and feather boas.

Monday, October 15, 2012

Pregnancy Take 2

If it seems like my blog has only been about cooking recently, you're right! I'm not sure why it's been the only thing I've been motivated to post about as there have been so many other interesting things going on for me. I figured I'd take a few moments and reflect on what has made this pregnancy SO different from the last one before she's out and I'm too busy with a newborn to post anything!

  • At home, I felt like my husband and I were talking about my first pregnancy all the time. We discussed names for a much longer time, talked about what baby gear we needed, and went through a lot more of the excitement and fears of "new parents."
  • This second time around, we barely discussed the fact that I was even pregnant until much later. I think some of that came from anxiety over the loss I had in between pregnancies and the threatened loss at the beginning of this pregnancy, some came from being busier around the house with a 3 year old, and some came from the comfort zone of "knowing what to expect."
  • At work, last time I felt like my baby bump was akin to a big, burning scarlet letter. I was an intern doing my residency and when I revealed my pregnancy to my chief residents because I needed a few hours off to get the quad screen ultrasound, they refused. After that, I was afraid to allow my pregnancy to be seen as a sign of weakness and didn't ask for any special treatment until I finally broke down and asked (under medical advisement) NOT to do a 24 hour call at 38+ weeks.
  • During this pregnancy my work has been amazing! They have been completely flexible about what I want to do for maternity leave, how I want my patients scheduled, and are constantly offering to cut back my hours or responsibilities if I feel I need a break.
  • During bug's pregnancy I struggled a lot with how my body was "letting me down." I am naturally a busy person and didn't like how tired and achy my body got and felt very antagonistic towards what was happening a lot of the time. I really didn't like being pregnant because I felt like it was stopping me from being me. Probably also due to the attitude I encountered at work, I felt I couldn't ever take it down a notch or ask for help which made me more stressed.
  • I think I was prepared for that to happen again this time and have been pleasantly surprised that it hasn't. The pregnancy itself has been similar (reflux a little worse, weight gain a little less), but I feel more in sync with my body and do what I can and accept the times I need to back off. 
  • Prepping for a baby was a lot harder (although more exciting) last time because we were starting from scratch. When getting ready for bug, we had to accumulate all the "baby stuff" which meant numerous shopping trips for nursery furniture, researching and refining registry choices, baby showers, and SO many thank you notes.
  • This time we literally have everything. We didn't even think about setting up the nursery or the bassinet or anything until about two weeks ago when we realized she could actually be born and come home any day. Then, it was a matter of dusting things off that were in the basement and collecting other things from where they were being stored at grandparent houses. So much easier, but a bit anti-climactic.
All of the other differences aside, I think the absolute biggest contributing factor to what made this pregnancy different was having bug around. She has made this pregnancy harder in many ways - I can't just flop on the couch and do nothing at the end of the night, I don't get much "alone time" to re-group, and I am constantly picking up her little girl messes that don't bother Daddy, but drive me insane. On the other hand, she has been a fresh new person to share the fun and excitement with and her reactions to my pregnancy have been some of my favorite moments. I love to see her face light up when she feels the baby kick. I crack up every time she tells me to open my mouth so she can "talk to her sister." And my husband and I have shared more than a few giggles at her attempts to understand breast-feeding (she nurses her dolls and gets very concerned about why I don't have milk for her sister yet...). 

So as this pregnancy draws to a close, I have to say it's had it's own challenges and I'll be happy when it's over, but I feel much more at peace and content at this stage then I did 3 1/2 years ago...

Friday, October 12, 2012

Friday Five Favs: Pumpkin Recipes

Fall is absolutely, positively my favorite time of year for baking and pumpkin is by far my favorite main ingredient. I have been lazy so far and been using canned pumpkin puree, but I promised the bug we would try our hand at roasting our own pumpkin very soon. Here are some of my favorite pumpkin recipes that I've discovered this year - be warned I like my baked goods heavy on the spices and usually double what is called for in most recipes.


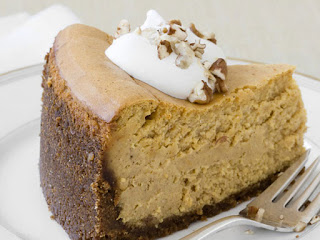
1. Almost Famous Pumpkin Cheesecake from the Food Network: I made this last week for our cousin's husband's birthday and it was a huge hit. The only changes I made were: to add some cinnamon and nutmeg to the graham cracker crumbs when I was making the crust, I didn't add pecans to the top, and I make my whipped cream with a dash of vanilla extract and a tablespoon or so of confectioner's sugar.


2. Pumpkin Pie Bars from Annie's Eats: I also made these for our cousin's husband's birthday because I wanted a different option because I didn't know what everyone would have a taste for. These really do come out with a creamy pie texture and are wonderful - my father-in-law liked these even better than the cheesecake (which was a big success). The only thing I changed was to omit the nuts because I didn't know if there were any allergy issues.


3. Pumpkin Whoopie Pies from Made in Melissa's Kitchen: I made these as a dessert the time before her husband's birthday when we went to our cousin's house for dinner - have you noticed a trend? Her husband loves baked goods so much that I find it very gratifying to bake for him:-) These were absolutely amazing! The cookie/cake batter is perfectly spiced and keeps the fall flavor prominent even with the sweet frosting. The only downside is the cream cheese in the frosting means you have to chill them and that makes the cake part get a little sticky and moist. I would like to try them again with a straight buttercream.


4. Pumpkin Cupcakes with Salted Caramel Buttercream from Made in Melissa's Kitchen: Bug and I made these for fun one weekend and everyone who tried them was blown away by how good they were. I was impressed with how spicy and moist the cake came out (I did double all the spices except the ginger) and how totally indulgent the salted caramel buttercream was. I had multiple coworkers in my office rave that this frosting was their favorite they have ever tasted.


5. Pumpkin Pancakes from The Curvy Carrot: We made these for breakfast last weekend and I thought they were quite yummy. Beating the egg whites gives the pancakes a really light and fluffy texture that is worth trying if you have never made a pancake like this. Definitely at least double the spice called for to get the fall flavor you'd expect from a pumpkin pancake.